
One of the kitchen’s strongest focus areas is cabinetry. Even though they might not be as slick and polished as stainless steel equipment, they typically span the entire room, unifying the entire area. Therefore, it’s essential that your cabinetry complements the overall design aesthetic when planning your kitchen around a theme. How to distress white kitchen cabinets?
Table of Contents
Common Style Of Distressed White Kitchen Cabinets
White Distressed Kitchen Cabinets
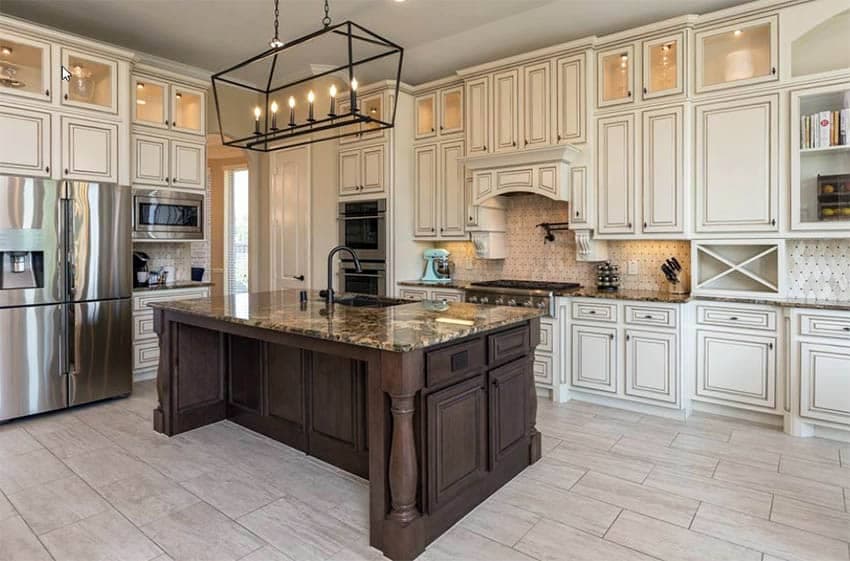
White cabinets are the simplest to distress because they readily absorb the pigments of the staining/antiquing glazes. Older or well-used white cabinets are even easier to work with because their original protective coatings have likely already been worn off.
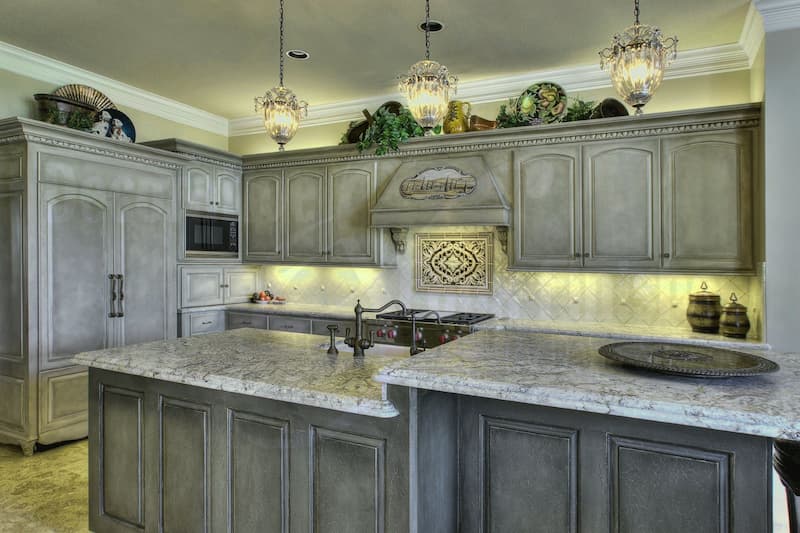
Distressed cabinets in kitchens with a country theme would also look good. These kitchens are renowned for their rough, unpretentious appearance that exudes a very cozy and homey vibe. For those who currently have white country-style cabinetry that somehow lacks warmth and personality, this example is unquestionably helpful. The lifeless white cabinet surfaces appear to come to life by using a heavier distressing technique that produces a fake “sanded down/worn-paint” look.
For this classic Spanish style antique white kitchen, a light-handed distressing approach was also employed, but is noticeable giving more emphasis to small grooves and details of the cabinet moldings. The small cervices were allowed to seep in more glaze to further emphasize them, adding more depth and texture without the use of wood grains, while the flat surfaces only received a light staining from the glaze.
This kitchen, like the one before it, has only been lightly distressed, putting more emphasis on the grooves and crevices. To give it a very light cool tint, the glaze used a tone that was somewhat yellowish green.
Grey Distressed Kitchen Cabinets
You can distress cabinets other than white ones. In fact, you can distress kitchen cabinets of any color, provided you use the right antiquing glaze color for the best results. Kitchens designed in modern or transitional styles would go perfectly with these distressed cabinets.
This modern kitchen island has a light gray cabinet base that has been antiqued with a lighter white color to give it a “dusty/dirty” look. The method used to distress the island gives it an unfinished appearance that contrasts with the other perfectly smooth and plain finishes in the area, adding depth to the kitchen.
The glaze in this traditional gray kitchen is a little bit darker than the existing base paint finish, in contrast to the other example, which uses a lighter glaze. Combining these two elements produces a very subtle distressed look that adds depth and body to the surfaces.
Light gray kitchen cabinets were lightly distressed to match the modern industrial appearance of the room. To further accentuate the small details of the kitchen, the glaze was primarily applied to cabinet grooves and crevices.
The gray cabinets in this U-shaped kitchen were aged using a different method. The typical method involves applying one antiquing glaze that is a little darker than the current finish but typically stays in the same color family. To make the painted wood cabinets appear to have faded, these cabinets, however, used two different colors. The “faux exposed wood” surface was painted in random strokes with a light beige color, and the small wood knots and crevices were highlighted with a dark gray glaze that was also painted in random strokes.
Black Distressed Kitchen Cabinets
Distressing black cabinets is a little more difficult but still doable. Black kitchen cabinets can be distressed using a variety of techniques, depending on the look you want to achieve.
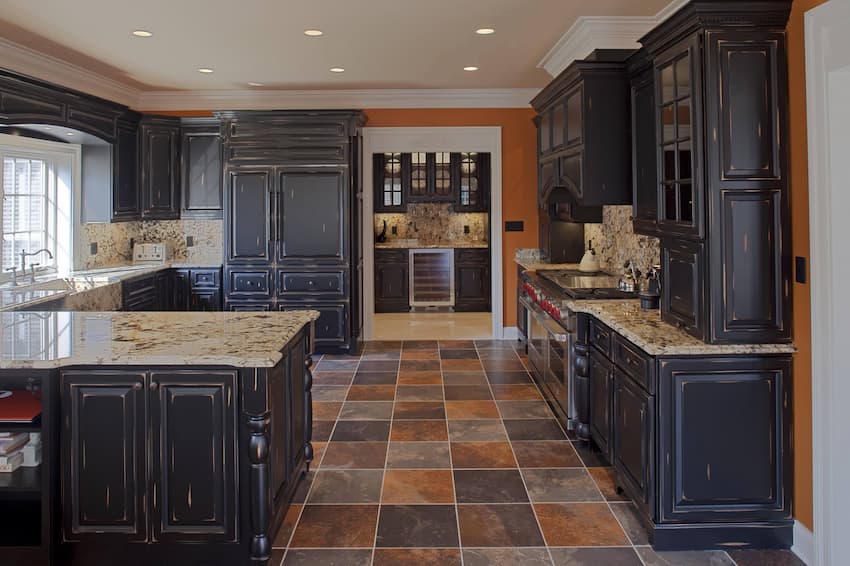
French kitchen cabinets are distinguished by their intricate door panels and moldings. Although the cabinets in this kitchen have a very dark black paint finish, the raised surfaces of the moldings make them simpler to sand down. Therefore, to create a distressed look, the raised edges of the moldings were simply sanded down and resealed rather than adding another layer of glazing, which would probably barely show on the dark paint surface.
These black cabinets’ molding edges were simply sanded down, following the same procedure as in the previous example. In order to emphasize the details and “frame” the panels, this kitchen cabinet specifically sanded down the outside corners of the moldings.
You can also distress black cabinets by using glazes, stains, or paint if you feel that sanding the wood base to reveal it is too much work. Some people prefer using thinned paint because it contains more pigments that would show against the black cabinet surface. This is because the base color is so dark, so you would need to use a more opaque glaze. In this illustration, thinned white paint is being used to highlight the fine grooves in the wood paneling on the black kitchen island.
Read about: Best Bathroom Cabinet Paint Colors
How To Distress White Kitchen Cabinets?
To give your cabinets an antiqued finish, follow these steps:
Storing The Contents Of Cabinets
Clean out the drawers and cabinets. Then, take out the pulls and knobs while putting the hardware to the side. If you’re using them again, keep them in a secure location.
Cleaning The Cabinets
With water and diluted grease-cutting dish detergent, clean the cabinets, doors, and drawers. Allow them to completely dry. Sand the cabinets just a little bit, and then use a clean rag or tack cloth to remove the dust. To protect the countertops, tape around the cabinets and place plastic sheeting on top of them. As you work, open windows and use fans to keep the space well-ventilated.
Using A Primer
Using a paintbrush or roller, apply one coat of primer. Utilize a product that is effective for your cabinets. Solid wood cabinets work best with a standard primer, while veneer cabinets should always be refinished with a primer designed for high-shine surfaces. Let the primer dry before lightly sanding the cabinets and removing the dust with a clean cloth or rag.
Note: If your kitchen cabinets are already white, you can skip priming and painting. Instead, distress the cabinets first, and then glaze them.
Applying The Paint
White latex paint should be applied to the cabinets in one to two coats, with the second coat being applied after the first has dried. Unless the wood was previously painted a different color, avoid concentrating too much on the edges or deeper grooves. For a truly distressed appearance, use a rag to apply the paint in circular motions instead of a paintbrush.
Distressing The cabinets
The fun part now is to scratch up the cabinets if they don’t already have enough bumps and bruises. Remove the dried paint by gently rubbing it away with a sanding block. Scrape the grooves and, if you feel comfortable doing it, chip away a little bit of the corners with a chisel.
Though it can be entertaining, banging up your cabinets won’t work as well with veneer cabinets. These more extreme distressing techniques should only be applied to actual wood. Finally, keep in mind that this type of distressing is permanent, so move slowly and periodically take a step back to inspect your work.
FAQs
Are Distressed Kitchen Cabinets in Style?
While this style of cabinet rose in popularity over the last decade, it’s now falling out of fashion. Consider more contemporary designs when selecting paint colors or wood tones for a cabinet replacement or reface.
How to Distress Kitchen Cabinets With Sandpaper?
Clean Cabinets
Put on a pair of rubber gloves, then use a damp rag to wipe the faces of the cabinets to get rid of any surface dust. Before continuing, allow the cabinets to dry completely.
Protect Walls
Protect the walls surrounding cabinets by using painters’ tape. Although there is usually time to remove an accidently made mark because glaze dries slowly, it is better to be safe than sorry.
Sand Edges
Sand the raised edges and corners of each cabinet door and/or opening using a sanding block covered in 80-grit sandpaper. Sand the wood until the painted wood is completely visible.
Apply Antiquing Glaze
A smooth, clean rag should have some antiquing glaze on it. Apply the glaze in small, circular motions to the front or side of one cabinet and continue until the entire section is coated. A word of advice: A little glaze goes a long way. Starting with too little glaze is preferable to starting with too much.
Smooth Finish
Using a clean area of your rag and a light touch, smooth out all the circular marks after the front or side of a cabinet has been completely covered in glaze. In order to achieve the desired effect, gently wipe the glaze in a straight up-and-down or side-to-side motion.
Darken Edges
Apply additional antiquing glaze with a small brush to the cabinets’ or doors’ distressed areas. It’s ok to use a lot of glaze in these areas because some of it will be taken off in the following step.
Remove Excess Glaze
Your index finger should be wrapped around a smooth, clean rag as you gently wipe away any extra glaze that has accumulated outside of the distressed areas made in the previous step.
Distress Remaining Cabinets
Work on each cabinet individually until all desired surfaces have been aged. To make sure the overall effect is consistent, take a moment to step back occasionally. Before sealing the glaze, allow it to dry for at least 24 hours after finishing.
Protect the Finish
To guard against deterioration of the distressed finish, lightly coat the surface with a clear, non-yellowing sealer. Using a non-yellowing sealer is crucial because regular polyurethane will turn yellow when applied over white paint.
Conclusion
Although investing in real, weathered white cabinets might be pricey and labor-intensive, the rustic appearance is still within reach. You can get the desired look without spending a lot of money by distressing new or unfinished cabinets. You may achieve an appearance that screams “vintage” with just a few dings, worn areas, scratches, and gouges. By manually antiquing the items, you can also decide how worn they should appear—whether you want a subtle amount of wear or more pronounced time weathering.